- Colection of 65 PHP scripts for $4.29 each
Knowledge Base
Welcome to the Shuttle Booking Software knowledge base page. Below are the most asked support questions about how to use our shuttle reservation software.
Shuttle Booking Software
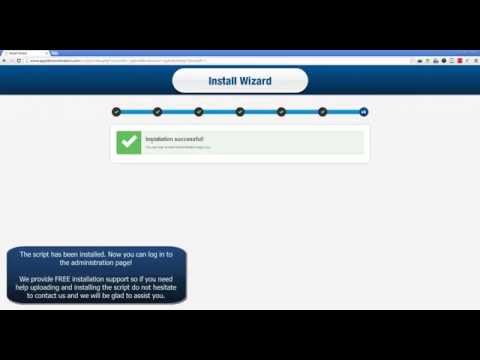
An installation wizard will automatically install the shuttle reservation software for you. All you need to do is upload the files onto your hosting account and follow the wizard. Click to watch the video.
Have a Wordpress and Joomla website? See how to install the software on Wordpress or Joomla...
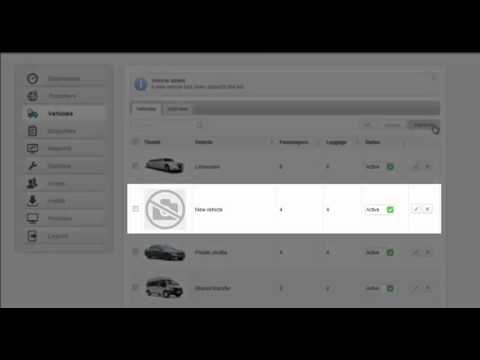
Adding different vehicle types to the software will actually allow you to manage a wide range of services, such as airport shuttle, private taxi services, luxury limo hire services, etc.
You can add all range of transfer services by adding vehicle types to the system. Using the VEHICLES page in the Admin you can add fleets and make them available for booking.
To add a new vehicle type, go to the VEHICLES page. Then click on the ADD NEW tab and fill the form in. Once you add the vehicle, you should go to TRANSFERS page and add predefined transfer routes and transfer fees. Otherwise the vehicle will not appear on the front-end.
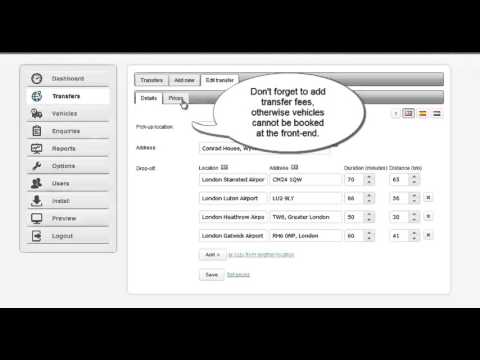
With Shuttle Booking Software you can add and manage predefined routes with multiple drop-offs. All predefined routes should have one pick-up location but can have multiple drop-offs. To add transfer to the the Shuttle Booking Software, go to the Admin, TRANSFERS page, then click on the ADD NEW tab. Specify the pick-up location and at least one drop-off location.
After creating your transfers, you need to add transfer fees for each vehicle that serves the route. Otherwise the vehicle will not be available for booking on the front-end.
From the TRANSFERS page, click on the corresponding pencil icon, then go to the PRICES tab. Add prices for each services (VEHICLES) you have previously added to the system. Please note that, you should have added vehicles by now. If not, please go to the VEHICLES page.
You can add multi language switch bar on the front-end of your shuttle reservation software by following the steps below:
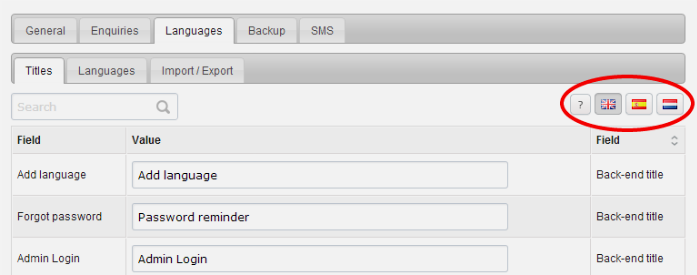
1. Go to OPTIONS>LANGUAGES
2. Click on the LANGUAGES tab and use ADD LANGUAGE button to add a new language.
3. Click on the newly created language and use the drop-down menu to set the desired language.
4. Add all the languages you'd like available on the front-end.
Please note that adding a language bar on the front-end, will not automatically translate the script. You need to do that by using the translation module or import translations. See also how you can translate Shuttle Booking Software using the Admin.
Watch the video to see how..
Shuttle Booking Software supports the following payment methods by default:
1. PayPal
2. Authorize.NET
3. Cash payments
4. Credit Card details collection (for offline processing)
5. Bank accounts details (for wire transfers)
You can enable/disable the each payment method from the Admin>OPTIONS>ENQUIRIES.
This video goes through the Options menu showing you a wide range of options available with the shuttle reservation software.
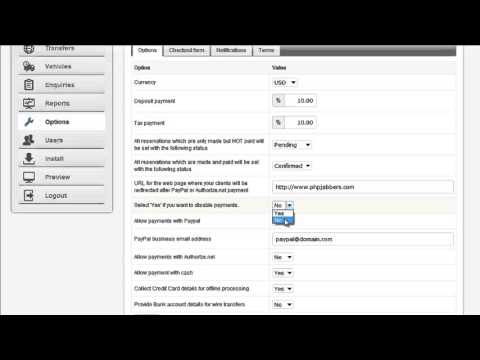
Paypal and Authorize.NET are supported payment gateways by default. If you need any other payment gateways added to your shuttle reservation software, send us an enquiry.
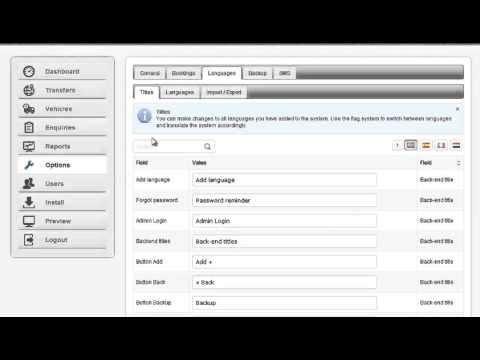
You can translate the Shuttle Booking Software via using the the Admin. Make sure you have added the multi language support on the front-end (see "How to add multi-language support to the front-end?").
Once you did that, go to OPTIONS>LANGUAGES>TITLES. Use the flag system at the upper right of the screen to change languages and replace the English titles with your translation. For more details watch a video on how to translate the Shuttle Booking Software using the Admin.
Language Module
IMPORT A LANGUAGE FILE: Under the Import/Export tab you can export the translation. After that open the file and replace the relevant column with the proper titles. Import the new language file using the Import feature.
This is important when you need to re-install the software, because new installations always come in the default English version. Make sure you export the translation before uninstalling the software.
In the Admin, go to OPTIONS>ENQUIRIES>TERMS. Then you can add your own booking terms.
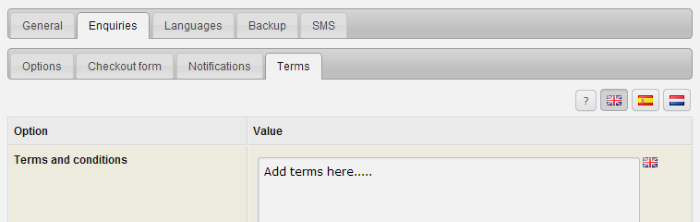
Add your own reservation terms
To make it mandatory for users to agree with your terms upon booking, make sure you have made the TERMS field in the reservation form a required one. To do that, go to OPTIONS>ENQUIRIES>CHECKOUT FORM and make sure to select Yes (Required) for the TERMS field.
In order to send SMS via your shuttle reservation software, you need to set an API key under the OPTIONS>SMS. Please note that the SMS service requires additional charges from a web SMS provider. Contact us to request an API key for your script...
You can customise all the notifications by going to OPTIONS>ENQUIRIES>NOTIFICATIONS. Select either CLIENT or ADMINISTRATOR tab depending on which notification you want to edit. You can enable or disable all notifications by selecting Yes/No for the corresponding notification.
At the NOTIFICATIONS page (OPTIONS>ENQUIRIES>NOTIFICATIONS) you can edit all email and SMS notifications. You can use the tokens listed in the info box to personalize your emails and text messages. Tokens pull the value from the your system and replace it with a real data.
For example, if you add "Dear {FirstName}", and your client Mark is the recipient, you can be sure that the message he gets, will start with the personalized greeting "Dear Mark".
Using the shuttle reservation software you can add/remove certain fields in the checkout form. To customize the reservation form, do the following:
1. In the ADMIN, go to the OPTIONS page.
2. Select ENQUIRIES tab, then CHECKOUT FORM.
3. Use the drop-down menu to set a value for each of the available fields. Select Yes or No if you want a field to be displayed or not, and Yes (Required) if you'd like that field to be mandatory. Click the SAVE button at the bottom of the page.
You may also rename the form fields by using the integrated Language module. To do that see the Q&A about how to translate Shuttle Booking Software using the Admin.
N.B. If you'd like any other field added to the reservation form, you need to edit the source code. Note that this can be done only under the Developer License. You are not a developer? Contact us - we'll do it for you.
There are two types of users you can have. To add users you must be administrator. Go to Users from the main navigation and then click Add user tab. Assign role by using the drop-down menu, fill in the details and then click SAVE.
User roles explained:
Admin - users with administrator level of access have full access rights to the system and settings.
Editor - users with editor level of access have access only to the Dashboard, Reservations and their Profile settings.
Do you have more questions?
Contact UsUseful Resources
More FAQs